Author Archives: Bert Loedeman

Setup project with COM library installation (Visual Studio)

Today at work I had a requirement on a setup that a certain COM library should be registered on application setup. Browsing the internet for a solution, I found the next information at MSDN (just copied here to prevent it from being lost :) ):

Steps to Register a COM Module in a Visual Studio .Net Deployment Project

  1. Add a COM object to your Visual Studio deployment project.
  2. In the Solution Explorer, right-click the module that you just added, and then click Properties.
    NOTE: The Properties window contains a table with two columns and x number of rows (the number of rows depends on the project). The left column lists the specific properties. The right column is explained in step 4.
  3. Go to Properties for this module (located by default in the upper-right corner of the .NET Deployment project), and then click Registry property.
    NOTE: The Registry property specifies whether a file, assembly, or project output group should be registered on a target computer during installation.
  4. There is a list box in the right column of the Registry property, which displays several options for you to choose from. Note the following details for an explanation of these options:
  • For assembly, registration is not normally required, and therefore the default is DoNotRegister (this means that the item will not be registered during the installation).
  • For a COM module, you have the options of COM, COMRelativePath, and COMSelfReg. Any one of those three options will register the COM module during the installation.

Note the following details about each choice:

  • COM: The module will be registered as a COM object by the Windows Installer engine. The deployment project will update the Class table, ProgID table, and other tables in the Registry Tables group of the corresponding .msi file. This is the recommended way to register a COM module.
  • COMRelativePath: The module will be registered as an isolated COM object by the Windows Installer engine. Note that this module will be used only by the application that the module is installed with.
  • COMSelfReg: The installer calls the DllRegisterServer function of that module at the time that you install the module and the DllUnregisterServer function at the time that you uninstall the module. The deployment project will update the SelfReg table of the corresponding .msi file. It is not recommended that the installation package use self-registration. Instead, the installation package should register modules by authoring one or more of the other tables provided by the installer for this purpose (that is, select the COM or COMRelativePath options). Many of the benefits of having a central installer service are lost with self-registration, because self-registration routines tend to hide critical configuration information.

You can now build your deployment project to allow the preceding modifications to register your COM objects in accordance with the registration property options that you selected in step 4.

Although it sounds frustrating, using this information, registering COM libraries at application setup is quite easy!

Happy coding!

Clean and minified Javascript

It has been a while since I last posted a technical post. I’m sorry, but I am too busy enjoying my work to keep you posted as much as I should.

Just a few days ago I was playing around with YSlow and PageSpeed, two add-ons on Firefox. Both stated my Javascript files were 1) to many and 2) not at all at minimum size.

Searching for an automated way of cleaning up and minifying my Javascript files, I bumped in on JSMin, a Javascript minifier that can be downloaded in C#. Do you hear the term HttpModule in your head already as I did?

When you try to implement JSMin, do consider the fact that your Javascript files will be stripped really rigorous: some of my files did not work anymore after minifying. The reason for this is that Javascript gives you the opportunity to write bad code. To prevent myself from writing rubbish Javascript files that fall apart using JSMin, I now use ‘the tool that hurts feelings’, JSLint. It hints you about bad code and, when obliged to, prevents you from failure when using JSMin afterwards ;)

Lucky coding :) !

First aid…

Again, off topic… But there is news to announce :) : I just passed my first aid exam – or EHBO axam in Dutch - (that’s one of many hobbies).

EHBO logo

If you are going to be out of luck some way and I happen to be in the neighbourhood, pray for me really knowing everything by heart at that moment ;) !

Move IMAP Personal Folder File in Outlook 2007

This post is kind-of off-topic concerning my main blog topic area, but 1) it has been a while since my last post and 2) the topic has caused me a headache, so I decided to blog it.

Besides my own mailbox, hosted in Exchange, I often load other IMAP mailboxes in the same Outlook profile. IMAP tries to work in the same way as Exchange (it leaves all messages on the server and – if properly configured – also stores sent items there). So far, so good.

Here comes the nasty part: reading this post, you probably faced the same problem as I did. Moving the data file from your personal folder to another folder is not just as easy as when working with a POP3 mailbox – when moving, Outlook just keeps generating a new PST file when you delete it. Besides, there is no option such as ‘move mailbox’.

Just a note before you read on: you cannot reload an ‘IMAP backup PST file’. If you are trying to do anything like that, just stop since you will fail reaching your goal. Therefore, backing up IMAP folders does not make any sense.

After the misery from the previous paragraph I can give you some relief: it is not hard to move the PST file. It’s just the ‘workflow’ that matters:

  1. Close Outlook.
  2. Open the Mail item in Control Panel.
  3. Open the profile to work on and go to its data file(s).
  4. Locate the original data file location.
  5. Let the data file window stay open!
  6. Move the PST file. Don’t rename or point to another file – silly, yes I know – or an empty PST file will definitely be created in the original folder.
  7. Double click the data file in the window you should have left open. It shows you an error message and after clicking that one away, you can select the new location of your mailbox.
  8. Close all mail windows.
  9. Open Outlook.
  10. [Check the original PST file folder for possible newly created mailbox files - if so, you made a mistake following my guidelines ;) .]
  11. You’re done!

Cheers!

Just banned IE6

Hi all,

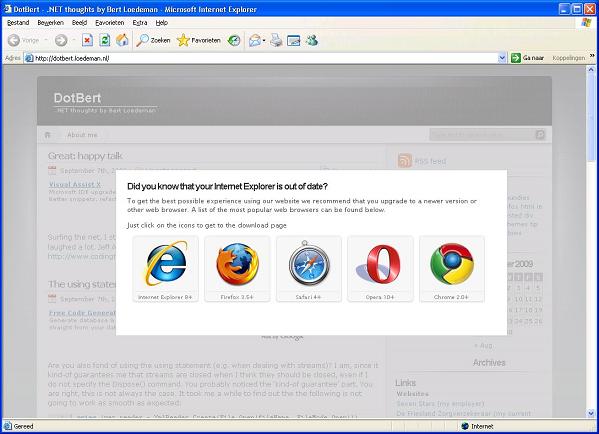
Unfortunately for all my blog readers stuck on IE6, I decided to leave IE6 without water and bread to help it die :) . In plain English: visitors to my blog using this crappy browser no longer get access to my blog, instead they are facing a nice-looking popup, asking them nicely if they already know to be outdated (and how to become alive again :) ).

The idea comes from http://code.google.com/p/ie6-upgrade-warning/. As a programmer, I decided to tweak the script a little to provide a better looking popup for my beloved IE6 visitors (statistics state that they are responsible for about 7% of my site visits, when I am writing this post – something to keep in mind when designing the get-alive-screen :) ).

What did I change?

  1. I added some scripting to disable select boxes below my popup (guess: a nasty IE bug keeps popping them over my popup, which troubles the IE6 view on my blog).
  2. I also changed the background to #ccc for a more relaxed view.
  3. For the same reason  I also changed opacity around the popup to 75% (just enough to see how interesting the blog could be, should they not have IE6 anymore).

Have a look at the result:

Bye IE6!

You can download the source code for this goal on the website mentioned above. The altered javascript file is located here: warning.js. Good luck banning IE6 :) !